


Servomotors:
Brand: Interface-Z
Reference: act-8servo-dmx
Servomotor = position-controlled motor.
Servomotors are used to animate objects, sculpture elements, parts of robots, or covers in front of projectors...
These motors rotate or position objects of varying weights (up to several kilograms for the more powerful ones) to a precise location.
The most common ones allow positioning over a quarter or half turn, some rotate continuously at variable speeds, and others are multi-turn winch servos. The variety of heads that can be adapted and fixed to the motor makes it possible to attach any object to be moved.

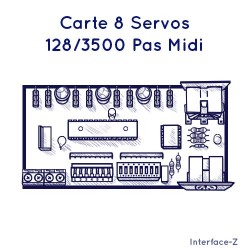
8 Servos DMX Board: configuration, outputs, power supply.
The Interface-Z Servomotor board allows you to control 8 of these motors simply by sending them real-time position commands. It recognizes the commands in the standard DMX protocol, used in stage control rooms, lighting consoles, motorized projectors, and light dimmers. The board ensures each object stays in the chosen position until the next movement, regardless of its weight.
These positions are distributed over the chosen range: 90° or 120° (or even 180°, depending on the connected motor). This board also allows you to save rest positions and has a Safety mode.
Servomotors can be purchased at any hobby store, but we can also supply them. The board’s documentation shows how to connect them, regardless of their brand. The most common servomotors are fully controllable with this board. Our Servo Control boards are compatible with all types of standard motors: mini-servos, metal gearboxes, winches, continuous rotation, etc. The only thing to check is the wiring order, which is mostly compatible with our boards, but variations may exist.
For more details on servomotors, refer to the "Servomotor" page in the Tips section.
Objects fixed on servomotors can be:
- tools: sensors (rangefinders, cameras, optical systems, cameras, etc.) or control buttons (adjustment potentiometers for devices, adjustment sliders);
- or elements of sculptures or decor, contributing to the visual effect perceived by the public in the installation.

Illustration
By attaching wooden sticks to the rotating head of servomotors, it is possible to create puppet animations, where the movements could be linked to music, public behavior, or even atmospheric conditions.
By using modeling winches, you can tension cables to move fabrics, raise and lower objects.
They are also used to close off, completely or partially with perforated plates, light projectors or a video projector (which allows achieving absolute black, difficult with just the video projector).
Very mechanically, they are often used to simply replace a finger... This is a way to automate pressing buttons on a device that cannot be disassembled, or the movement of a lighting or sound control slider.
It is also possible to couple two servomotors to orient an object in three spatial directions, for example, to make a small projector with ultraluminous LEDs.
It is important to carefully size the servomotors based on the weight they lift: a motor that is too weak will strain and could break.

On the left, an under-sized motor, struggling and forcing;
on the right, a motor sufficiently powerful for this application.
Power supply, rest position, safety mode, interference... Some things to know.
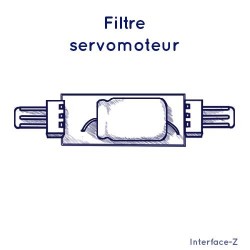
This short video shows the use and available wires on this type of power supply.
How to connect servomotors to the board, which power supply to use, which software is compatible with the board?
The 8 Servomotors DMX electronic board can be controlled from any software or console/mixer/controller capable of sending DMX messages.
Make sure to connect the wires in the correct direction to avoid damaging the motor. A marking on the board helps with orientation.

Power supply, DMX connectors, servomotors.
See Tips & Tricks for using a PC power supply with this board.
To improve the product's quality, we deliberately separated the two types of power supplies to avoid interference from the servomotors, which would otherwise cause uncontrollable vibrations in the case of intense motor load.
- Standard servomotor range adjustable to 90° or 120°, in 128 steps or 3500 steps.
- By DMX commands.
- The entire 512 DMX channels are addressable.
- Activated by switches on the board.
- Be cautious not to activate the memorization if you don't wish to use it.
Memorizing positions allows the servomotors to automatically return to these chosen positions the next time the board starts up.
The safety feature ensures that, in the absence of MIDI commands, the servomotors return to the rest position. For example, if the computer controlling the motors stops unexpectedly, this prevents overloading and damage.
Be cautious with running status in MIDI.
~/|(o;;O)/|~

Data sheet
Download
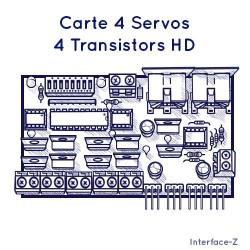
Here are the components usefull for connecting servomotors on the actuators boards.
Motors can be directly plugged on the control boards, using their 3-ways connectors. Anyway these wires are short. For alternative plugging you can see :
You might also like
Servomotors:
Brand: Interface-Z
Reference: act-8servo-dmx